For 12Vdc connection use solderless power plug like this one:

It's easy to use with our bread board, and have a standard connection to any 12Vdc wall power supply.
WARNING: Ensure the power is separate from our current assembly - it's only for the electromagnetic door lock.
NOTE: Always orient the Solenoid Lock with the tip facing upwards
Open your Arduino IDE and copy the following sketch (link):
#include <Adafruit_Fingerprint.h>
#include <SoftwareSerial.h>
int getFingerprintIDez();
int green = 4;
int red = 5;
int relay = 6;
// pin #2 is IN (connect sensor GREEN wire)
// pin #3 is OUT (connect sensor YELLOW wire)
SoftwareSerial mySerial(2, 3);
Adafruit_Fingerprint finger = Adafruit_Fingerprint(&mySerial);
void setup()
{
Serial.begin(9600);
Serial.println("fingertest");
// set the data rate for the sensor serial port
finger.begin(57600);
if (finger.verifyPassword()) {
Serial.println("Found fingerprint sensor!");
} else {
Serial.println("Did not find fingerprint sensor :(");
while (1);
}
Serial.println("Waiting for valid finger...");
pinMode(green, OUTPUT);
pinMode(relay, OUTPUT);
pinMode(red, OUTPUT);
digitalWrite(relay, HIGH);
}
void loop() // run over and over again
{
getFingerprintIDez();
delay(50);
digitalWrite(red, HIGH);
}
uint8_t getFingerprintID() {
uint8_t p = finger.getImage();
p = finger.image2Tz();
p = finger.fingerFastSearch();
// found a match
Serial.print("Found ID #"); Serial.print(finger.fingerID);
Serial.print(" with confidence of "); Serial.println(finger.confidence);
}
// returns -1 if failed, otherwise returns ID#
int getFingerprintIDez() {
uint8_t p = finger.getImage();
if (p != FINGERPRINT_OK) return -1;
p = finger.image2Tz();
if (p != FINGERPRINT_OK) return -1;
p = finger.fingerFastSearch();
if (p != FINGERPRINT_OK) return -1;
// found a match
Serial.print("Found ID #"); Serial.print(finger.fingerID);
Serial.print(" with confidence of "); Serial.println(finger.confidence);
// manage LED's and relay
digitalWrite(green, HIGH);
digitalWrite(relay, LOW);
digitalWrite(red, LOW);
delay(5000); //5 secs delay before the goes relay OFF
digitalWrite(relay, HIGH);
digitalWrite(green, LOW);
return finger.fingerID;
}
All done. Placing the correct finger to the sensor will activate electromagnetic door lock,
and you can open the door. But to note, there is a time frame – 5 second and the door locks gets back to the lock position.
You will need to scan the correct finger again to open them.
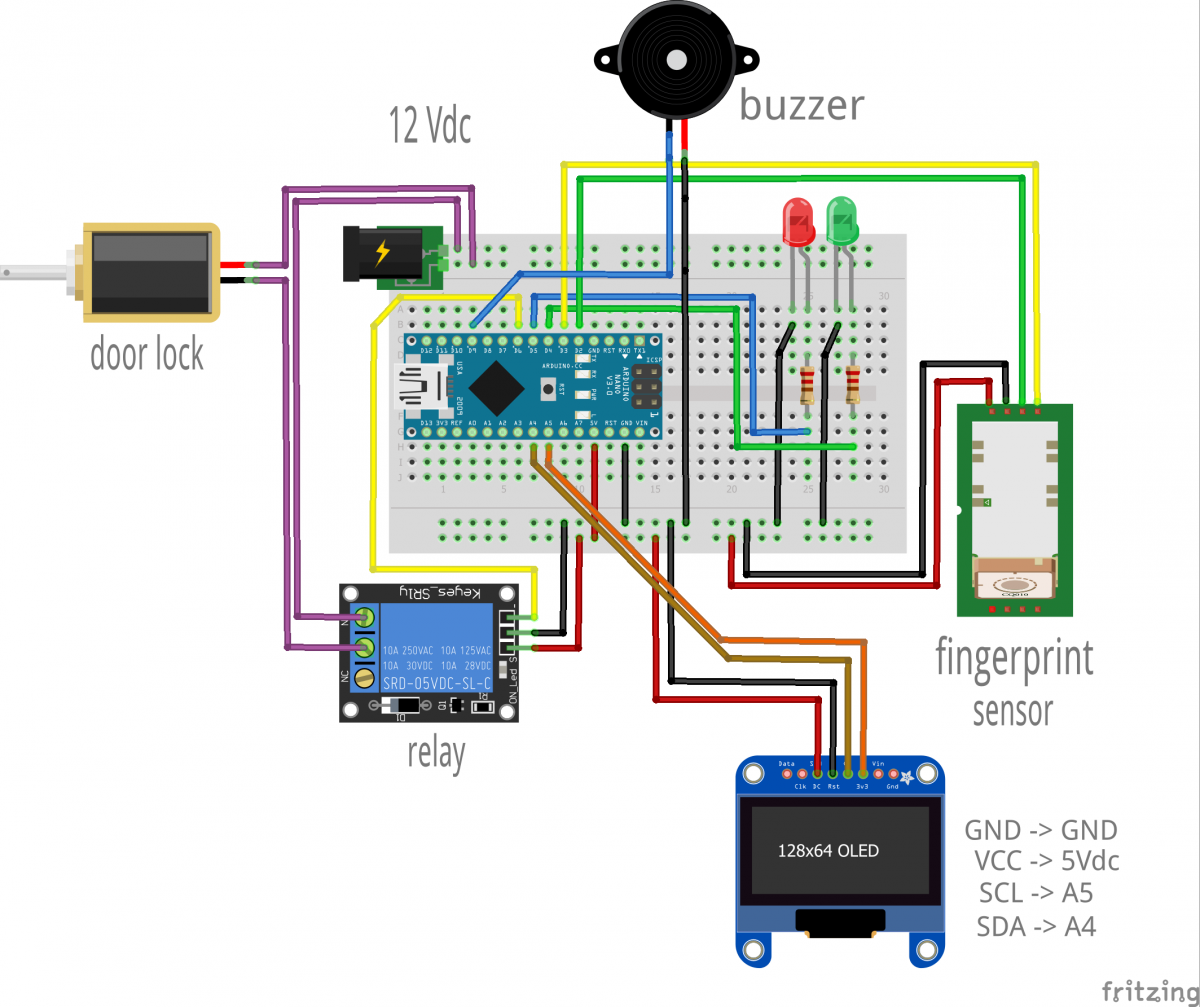
Now, Let's make the system more interesting, we will add a buzzer and OLED display.
As per diagram below, connect the buzzer “+” leg to port D9, and second leg to GND line. Good, now the OLED display, connect:
-
VCC to +5Vdc line (red)
-
GND to GND line (black)
-
SCL to A5
-
SDA to A4

Download the library for the OLED screen:
https://github.com/olikraus/U8glib_Arduino
and add it to your Arduino IDE libraries folder (main is located: C:\arduino-1.6.12\libraries)
Open your Arduino IDE and copy the sketch link ( Provided on purchase )
All done.
Placing the correct finger on the sensor will activate electromagnetic door lock, and message will appears on the OLED screen with the audio signal. Cool, right...
There is a many ways to use our Fingerprint Sensor Kit. Upload the ON-OFF code,
add part to communicate with the relay, remove the electromagnetic door lock unit,
use the relay contacts to control any other power unit:
computer, television set, garden sprinkling system, light, gate... etc.
- If you get a Windows GUI software Communications error –
- ensure all connections follow the colour coding: yellow to RX, green to TX.
- Uploading code commu
- communication error – ensure you select the correct COM port.
-
Fingerprint sensor not working (no red blinking lights) – check all connections,ensure that the red wire is connected to +5V and that the black wire is connected to GND.
Good work.
Hope you have a nice time playing with the kit. The sensitivity of the fingerprint sensor is impressive, and the potential usage of this kit is limited only by your imagination (ex. time to lock access to my workshop or your den ). The code is very logical, easy to follow.
A great kit to play. Have fun.